It seems lately I've taken a little bit of a liking to necklaces, and I randomly decided this afternoon that I needed to keep them better organized and easily accessible. I scanned my Pinterest boards to see if there was something quick and easy I could do without having to buy any supplies, but I didn't find anything. I glanced back into my room and saw this mirror that I got some years ago, but don't really use now. I looked in one of my craft supply drawers and saw some of those Command hooks that we got a while ago, but anything we hung on the wall with them ended up crashing to the ground, usually in the middle night after only a couple weeks of hanging. Instead of just putting the hooks on the wall, I thought it would be a cooler display to hang them on the mirror, and I was right! I think it's a pretty neat solution, and you can always add more hooks when needed. I like that this mirror (from IKEA) has a little shelf, too, for extras or other pieces of jewelry. I'm sure I'm not the first to come up with this, but I was pretty pleased that I thought to put it together.
Necklace Display
Posted on: Saturday, September 15, 2012
It seems lately I've taken a little bit of a liking to necklaces, and I randomly decided this afternoon that I needed to keep them better organized and easily accessible. I scanned my Pinterest boards to see if there was something quick and easy I could do without having to buy any supplies, but I didn't find anything. I glanced back into my room and saw this mirror that I got some years ago, but don't really use now. I looked in one of my craft supply drawers and saw some of those Command hooks that we got a while ago, but anything we hung on the wall with them ended up crashing to the ground, usually in the middle night after only a couple weeks of hanging. Instead of just putting the hooks on the wall, I thought it would be a cooler display to hang them on the mirror, and I was right! I think it's a pretty neat solution, and you can always add more hooks when needed. I like that this mirror (from IKEA) has a little shelf, too, for extras or other pieces of jewelry. I'm sure I'm not the first to come up with this, but I was pretty pleased that I thought to put it together.
Wednesday Wedding: Little Details
Posted on: Wednesday, January 18, 2012
 |
| via |
 |
| via |
 |
| via |
 |
| via |
 |
| via |
 |
| via |
 |
| via |
 |
| via |
 |
| via |
 |
| via |
 |
| via |
 |
| via |
 |
| via via |
 |
| via |
 |
| via |
I've Been Reblogged
Posted on: Thursday, January 5, 2012
So, this thing happened around Christmas, where I made this simple scarf organizer, and posted it to Pinterest to share the idea (which I found in the first place on Pinterest), and for the next week or so my iphone wouldn't stop sending me notifications about people repinning, liking and commenting. And my blog page views shot up to over 2,000. Whoa. Husband and I joked (and still do) about how I had become an internet sensation (ha ha).
Even though we're coming back to reality from this brief internet stardom (I made it to the popular page, that's something?), I think it is pretty cool that some other blogs have linked to my site and reposted the scarf project. You can find a little mention of it at:
I also gained some new followers in the process. Welcome and thanks for reading!
- From the desk of Mrs. M
PS- Also found my project mentioned here, here, and here. :)
Even though we're coming back to reality from this brief internet stardom (I made it to the popular page, that's something?), I think it is pretty cool that some other blogs have linked to my site and reposted the scarf project. You can find a little mention of it at:
and
I also gained some new followers in the process. Welcome and thanks for reading!
- From the desk of Mrs. M
PS- Also found my project mentioned here, here, and here. :)
Pinterest Project: Scarf Organization
Posted on: Saturday, December 24, 2011
The first thing I knew I wanted to "make" for the house was this simple scarf organizer I found on Pinterest. I am such a scarf lady, so this was much needed (my scarves were previously stored in a bag). Kyle thought it wouldn't work because they would just slide to one end, but I have proven him wrong.
I switched it over to a sturdy wooden hanger to avoid bending the plastic one too much. I'll be sure to share any other Pinspirational projects I take on around the house. The next one up might be this, making an ornament from the tree when it is time for it to go.
- From the desk of Mrs. M
- From the desk of Mrs. M
Wednesday Wedding: Guest Blogger- Kendall
Posted on: Wednesday, December 7, 2011
They
say every little girl dreams about her wedding day. Call me weird, but I didn't
start dreaming about my wedding day until I learned about the crafting
community and saw how creative and personalized weddings could become. Since my
eyes were opened to that fantastic world of hot glue, sewing machines, and
paint, I've wanted nothing more than to craft as much for my wedding as
possible. (Minus the whole making-your-own-wedding-dress thing... I'm not THAT
good.)
Now that I am engaged to be married in May, I've throw myself headfirst into craft blogs, tutorials, and pouring over websites filled with creative and unique ideas.
First and foremost I wanted my wedding to reflect my and Adam's personality and tastes, and I wanted (and needed) to do it on a tight just-gratuated-from-college budget. I also wanted the decorations to be something that wouldn't just be used that day, but something we could bring into our first home together and use as decor and as a reminder of that special day.
I graduated college with a degree in Graphic Design, so it was already pretty much a given that I would be designing my own invitations and save-the-dates. They honestly were the easy part. In fact, I think the save-the-dates were done before the proposal even happened...
I love how it turned out, but more than that, I love the fact that it's something I made with my own two hands and that I can have sitting out for many years to come. It was definitely a labor, but it was a labor of love, and I had a lot of fun creating it.
166 Days til the wedding... Yeah, I still have time for more crafting.
....................................
Thank you, Kendall! I don't typically like how fake flowers look either, but yours are so pretty! I am impressed and I'm excited to see what else you're crafting for your wedding!
- From the desk of Mrs. M
Now that I am engaged to be married in May, I've throw myself headfirst into craft blogs, tutorials, and pouring over websites filled with creative and unique ideas.
First and foremost I wanted my wedding to reflect my and Adam's personality and tastes, and I wanted (and needed) to do it on a tight just-gratuated-from-college budget. I also wanted the decorations to be something that wouldn't just be used that day, but something we could bring into our first home together and use as decor and as a reminder of that special day.
I graduated college with a degree in Graphic Design, so it was already pretty much a given that I would be designing my own invitations and save-the-dates. They honestly were the easy part. In fact, I think the save-the-dates were done before the proposal even happened...
Despite
my typical knack for crafts and ingenuity, getting started from scratch on a
crafted wedding was more difficult than I thought it would be. I spent the
first month seeing so many awesome ideas that I wanted to do them all and had a
hard time focusing my efforts on any one project. Once I got my craft ADD
period out of the way and settled on a theme and a color palette, I buckled
down on my first big project. For this I made the decision not to use any
flowers in the wedding or reception. In part because I thought I could
save some money this way, but also because my mom has always had her wedding
bouquet sitting on her dresser (fake flowers, of course) and I loved the idea
that it was always out and visible. I don't typically like the look of fake
flowers so I looked for all sorts of alternatives, but in the end I decided I
still wanted it to resemble flowers, so I settled on buying 2 large spools of
ribbon from B. B. Crafts and using this tutorial to make ribbon roses. This
would be easy enough, right??? I'm good with a needle and thread, how hard
could it be? Many painstaking hours, a misdiagnosed pinched nerve in my neck,
and a few color changes later, I finally had enough ribbon roses to make up my
bouquet and some bridesmaid bouquets.
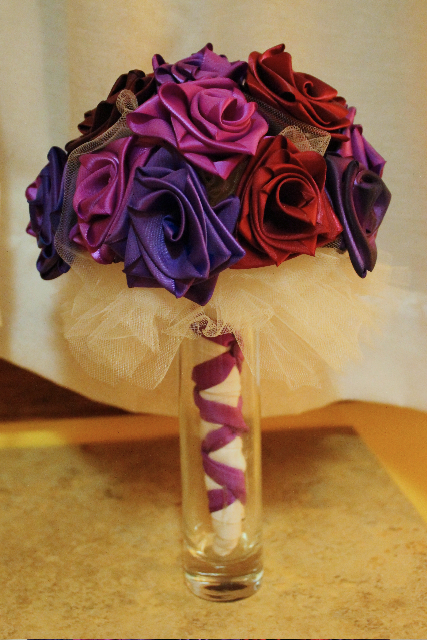
Tadaaa!
Tadaaa!
Let's review the process, shall we?
I used: 2 colors of ribbon, matching thread, needles, ruler, floral wire, floral tape, scissors, pinking shears, a lighter, wire cutters, elastic, tulle, and a whole lot of patience. Eventually I used watered down paint and dip-dyed half the roses to give them varying shades of purple and red as well, but that's entirely optional.
I used: 2 colors of ribbon, matching thread, needles, ruler, floral wire, floral tape, scissors, pinking shears, a lighter, wire cutters, elastic, tulle, and a whole lot of patience. Eventually I used watered down paint and dip-dyed half the roses to give them varying shades of purple and red as well, but that's entirely optional.
And here is what I got!
I love how it turned out, but more than that, I love the fact that it's something I made with my own two hands and that I can have sitting out for many years to come. It was definitely a labor, but it was a labor of love, and I had a lot of fun creating it.
166 Days til the wedding... Yeah, I still have time for more crafting.
....................................
Thank you, Kendall! I don't typically like how fake flowers look either, but yours are so pretty! I am impressed and I'm excited to see what else you're crafting for your wedding!
- From the desk of Mrs. M
Christmas in Color
Posted on: Sunday, November 27, 2011
A better version of the gift tag I made earlier, since I refilled my craft supplies.
- From the desk of Mrs. M
DIY: Holiday Gift Tags
Posted on: Saturday, November 19, 2011
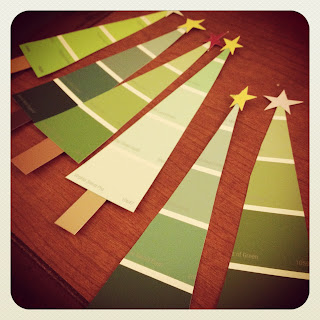
I caught a glimpse of this cool idea for making your own gift tags for Christmas on Pinterest, and you know how I love projects with paint samples, so I made a quick one today. I will have to go get more paint samples as my supply is running low. I also had to use tape since I have no glue, but it worked. Also, I think yarn would look better for the hanging loop. SO basically this is not the most polished project and maybe I should have waited to post better ones but you get the idea. They are easy to make, and you could do other things aside from Christmas trees. I also ordered Christmas cards today... I guess I'm getting a little into the holiday spirit; this will afterall be our first married Christmas (whether we get to celebrate together on the day or not) so I thought it was fitting to send cards from the both of us.
Update: Here is a photo of more tags I made when my supplies had been refilled!
- From the desk of Mrs. M
from the desk All rights reserved © Blog Milk Powered by Blogger


